

Easy DIY Day: How to make your own cushion blush compact!
The not-so-big-surprise is that just about everything comes in cushion form nowadays. In addition to the standard cushion foundation, there’s now a tone-up cushion, cushion highlighter, corrector, blush, eyeliner, concealer, and even cushion fragrance. I’m just waiting for the invention of a cushion brow stamp to take the place of the powder one!
I had a lot of fun coming up with my own DIY cushion compact foundation, which was easy and allowed me to customize a shade to match my skin tone to a tee. This time, I decided to try my hand at making a cushion blush to help me resist buying one. It turned out to be ridiculously easy to make!
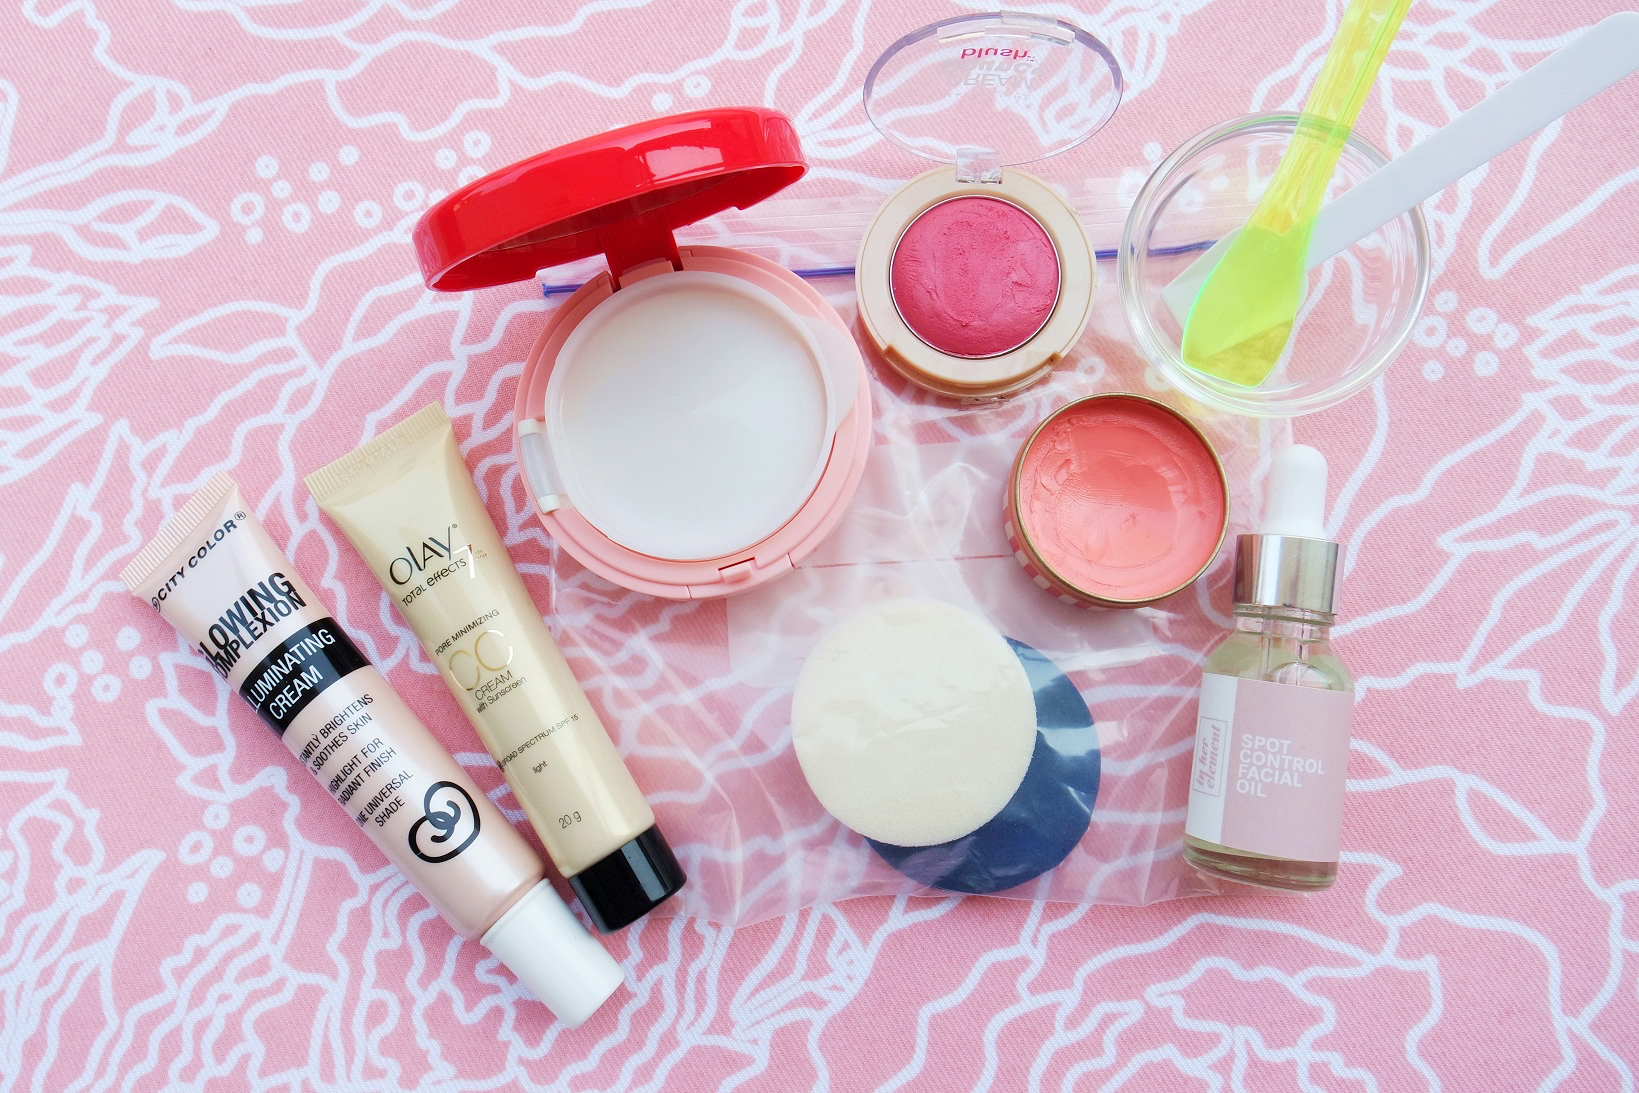
Materials:
- Empty and clean cushion compact case* with cushion and applicator sponge
- Small bowl
- Mixing spoons
- Cream or mousse blush (or several, if you want try mixing your own shade)
- Facial oil
- CC cream
- Liquid highlighter/illuminator (optional)
* If you are using a cushion compact case meant specifically for cushion foundation, you may need to whip up a bigger batch of the blush mixture to saturate the cushion better. The quality and pigmentation of the blush cushion will all depend on the products you used to blend into it, and it’s best to use this up in a month to ensure freshness. Cushion compacts may be purchased for P235 at Althea.
You may also re-use an old cushion compact simply by washing the empty cushion with dishwashing fluid or baby shampoo, and then rinsing the compact as well.
Now here's how to make the liquid blush!
Step 1: Scoop some cream or mousse blush into a small bowl. Sky’s the limit as you can use a blend of two or more colors, if you’d prefer to create a custom shade. Make sure to use a new or completely cleaned spoon to scoop out product from their original containers to avoid cross-contamination and unintended color mixing.
You can actually also use lipsticks. The ingredients of lipsticks are technically the same as a cream or liquid blush, just with perhaps more or a stiffer kind of wax. If you can put it on your lips, you should be able to put it on your cheeks.

Step 2: Add a drop or two of facial oil to dissolve the pigment and mix well. It is imperative that you use the tiniest amount of oil possible, because this merely serves to help blend the pigment together. I’ve discovered that water-based serums tend to turn cream and mousse blushes lumpy, while using too much oil can cause the cushion blush formula to separate. Adjust the shade and intensity of pigmentation by adding more cream blush until you get the hue you want. Make sure that it’s correct because it will be difficult adjust the shade later on. It’s also best to make the blush color blend super pigmented at first as it will thin out and look a bit more sheer as you add more ingredients.

Step 3: Add CC cream and blend until you get the standard cushion makeup consistency. This is also the point where you can incorporate some liquid highlighter/illuminator for that extra dewy glow.

Step 4: Pour half of the formula at the bottom of your cushion compact case, replace the cushion, and then pour the other half over the cushion. Saturate the cushion by pressing the product in with your mixing spoon. Aaaand, you’re done!

So why use CC cream? I noticed that most of the K-beauty cushion blushes I’ve encountered have a milky, almost-pastel coloring to them. Since CC cream has a brightening/insta-white effect, it could help mimic that milkiness.

I’ve been using my DIY cushion blush everyday since making it! I love the level of buildable pigmentation that I’m getting, and it blends at the edges with just a few pats. The liquid highlighter also gives my cheeks a hydrated, dewy look.
Have you ever tried cushion blushes before? Will you be trying this DIY? What shade would you like your custom cushion blush to have?